Introduction
You might have used create react app or angular-cli to generate the boilerplate for your application. Even though these tools use webpack under the hood, they abstract most of the configuration for you.
But sometimes, depending on the requirements, you might have to create a custom configuration from scratch or customize the existing configuration. This is where understanding webpack or any other similar tool helps. So let's try to create a webpack application and understand its concepts.
This article is part one of the webpack series. In this, we go over basic webpack concepts. In the next one, we will go over some advanced concepts like code-splitting, multiple configurations, source map configurations, etc.
The first part of this article covers basic webpack concepts. In the second part, we'll build a simple application with everything we learned.
What is webpack?
Webpack is a module bundler for JavaScript applications. In plain English, webpack creates a dependency graph of all files (using imports/require statements, plugins, loaders, etc.). Using the dependency graph generated, webpack outputs the bundled code.
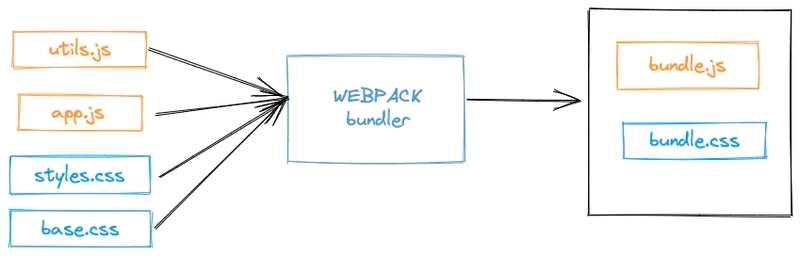
Webpack treats every file or asset as a module. Out of the box, webpack only supports JavaScript files (ES Modules, CommonJS modules, AMD Modules).
But we can extend it to other file types like CSS, images, etc., with the help of loaders and plugins. Which we will be looking at later in this article.
Core Concepts
Key concepts which are helpful when building applications with webpack are
- Entry
- Output
- Loaders
- Plugins
- Mode
Entry
An entry point is a JavaScript file that serves as a starting point for webpack to collect all the dependencies used by your application to build a dependency graph. Dependencies are libraries like React, jQuery, etc., OR static assets like images, CSS files, etc.
From webpack >= 4, Out of the box, src/index.js serves as the entry point.
But you can configure the entry point using the entry property in the config file and have multiple entry points.
    module.exports = {
      entry: 'src/app.js', //Custom entry point
    };
Output
Output is the path where webpack will bundle all the dependencies and your app code into single or multiple files.
From webpack >= 4, Out of box dist/main.js serves as the output path.
You can also configure output using the output property like an entry point.
    module.exports = {
      entry: 'src/app.js', //Custom entry point,
      output: {
        filename: 'main.js',
        path: path.resolve(__dirname, 'build'), //custom output point
      },
    };
Loaders
Loaders are extensions that help webpack process other types of files like CSS, images, markdown files, etc.
Loaders convert these files into JavaScript modules. These converted modules will be used by webpack.
For example, with the help of ts-loader, you can transpile typescript files.
     module: {
        rules: [
          {
            test: /\.ts$/i,
            use: ["ts-loader"],
          },
        ],
      },
Loaders have two properties:
-
test- Used to identify the file types which need to be transformed to javascript modules. -
Use- Used to determine what loader to use on this file type.
If you want to use multiple loaders on a single file type, you can pass the
useproperty an array['loader-1', 'loader-2'].
But keep in mind that loaders will be applied from right to left so that loader-2 will be applied first, then loader-1.
     module: {
        rules: [
          {
            test: /\.css$/i,
            use: ["style-loader", "css-loader"],
          },
        ],
      },
In the above code, css-loader will be applied first and then style-loader.
-
css-loader- Adds support to import CSS files directly into a javascript file. -
style-loader- Used to inject the styles generated fromcss-loaderinto the DOM.
Plugins
While loaders can transform specific modules other than JS, plugins can perform various tasks like bundle optimization, asset management, etc.
Webpack itself is made-up of plugins.
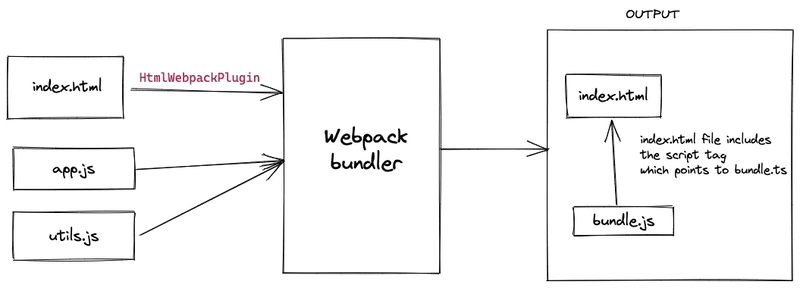
To keep things simple, let's have a look at HtmlWebpackPlugin.
HtmlWebpackPlugin will create an HTML template and add the script tags, which point to bundled JS.
You can install it with npm.
npm install html-webpack-plugin --save-dev
And add it config using the plugins property.
{
    ...,
      plugins: [
          new HtmlWebpackPlugin({
            title: 'My App',
            template: path.resolve(__dirname, 'src', 'index.html'),
          }),
        ],
    ...,
}
Mode
Mode allows webpack to use built-in optimizations based on the environment. For example, if you set the mode to production it minifies the output code. You can set the mode as
- production (default)
- development
- none
{
    ...,
        mode: "development"
    ...,
}
Example App
Let's build a simple app that calculates the age.
Create a folder with whatever name you want. Here, I'm calling it age-calculator-webpack.
    mkdir age-calculator-webpack
    cd age-calculator-webpack
After that, run npm init -y to initialize the project.
Now let's install webpack.
npm install webpack webpack-cli --save-dev
Also, install plugins for CSS and HTML
npm install css-loader style-loader html-webpack-plugin
Let's create the files.
touch webpack.config.js
mkdir src # creates the src folder
cd src
touch app.js
The directory structure looks like this
  ├── src
  │   ├── app.js
  ├── README.md
  ├── package-lock.json
  ├── package.json
  └── webpack.config.js
Basic setup
Now let's configure webpack using webpack.config.js
const path = require('path');

module.exports = {
entry: path.resolve(__dirname, 'src/app.js'),
output: {
  filename: 'main.js',
  path: path.resolve(__dirname, 'build'),
},

mode: "development"
};
Add the webpack command in package.json for bundling the code.
...
"scripts": {
    "build": "webpack",
  },
...
We can now test the configuration by adding a simple console statement in src/app.js
console.log('Hello from webpack!');
Now run npm run build and you will see a folder named build created with main.js inside it.
Adding a plugin
Now create an html file src/index.html and paste the following contents.
<!DOCTYPE html>
<html lang="en">

<head>
    <meta charset="UTF-8">
    <meta http-equiv="X-UA-Compatible" content="IE=edge">
    <meta name="viewport" content="width=device-width, initial-scale=1.0">
    <title>Age calculation with webpack</title>
</head>
<body>
    <h1>Age calculator</h1>
    <form id="form">
        <label for="dob">Your date of birth</label>
        <input type="date" name="dob" id="dob">
        <button type="submit" id="submit">Calculate my age</button>
    </form>
    <br>
    <br>

    <div id="result"></div>
</body>
</html>
Now add the HtmlWebpackPlugin plugin in the webpack config. Then we can go through the contents of the src/index.html file.
const path = require('path');
const HtmlWebpackPlugin = require('html-webpack-plugin');

module.exports = {
  entry: path.resolve(__dirname, 'src/app.js'),
  output: {
    filename: 'main.js',
    path: path.resolve(__dirname, 'build'),
  },
  plugins: [
    new HtmlWebpackPlugin({
      title: 'My App',
      template: path.resolve(__dirname, 'src','index.html'),
    }),
  ],
  mode: "development"
};
We're passing two options to HtmlWebpackPlugin
-
title- Name of the template -
template- path to the template
Now rerun the npm run build. If you observe inside the build directory, two files are created.
build
├── index.html
└── main.js
Open the build/index.html file in your browser and open the console. You will see this message.

Adding a webpack dev server for faster development
Running npm run build whenever the code changes would be very tedious. So to speed up the development, we can use the webpack dev server. The Webpack dev server is a static server (based on express.js) and supports live reloading.
Installing the webpack dev server by running
npm install webpack-dev-server --save-dev
Now add webpack dev server config inside webpack.config.js with the devServer property.
const path = require('path');
const HtmlWebpackPlugin = require('html-webpack-plugin');

module.exports = {
  entry: path.resolve(__dirname, 'src/app.js'),
  output: {
    filename: 'main.js',
    path: path.resolve(__dirname, 'build'),
  },
  plugins: [
    new HtmlWebpackPlugin({
      title: 'My App',
      template: path.resolve(__dirname, 'src', 'index.html'),
    }),
  ],
  module: {
    rules: [
      {
        test: /\.css$/i,
        use: ["style-loader", "css-loader"],
      },
    ],
  },
  devServer: {
    static: path.join(__dirname, 'build'),
    port: 3000,
  },
  mode: "development"
};
Here we're passing
-
static- Path to the static files, i.e., bundled javascript, html, and other assets -
port- Port number for the dev server
Add command for stating dev server in package.json
webpack serve starts the dev server on port number 3000 (defined in the config)
{
  "name": "webpack-5-tutorial",
  "version": "1.0.0",
  "description": "",
  "main": "index.js",
  "scripts": {
    "test": "echo \"Error: no test specified\" && exit 1",
    "build": "webpack",
    "start": "webpack serve"
  },
  "repository": {
    "type": "git",
    "url": "git+https://github.com/bgopikrishna/webpack-5-tutorial.git"
  },
  "keywords": [],
  "author": "",
  "license": "ISC",
  "bugs": {
    "url": "https://github.com/bgopikrishna/webpack-5-tutorial/issues"
  },
  "homepage": "https://github.com/bgopikrishna/webpack-5-tutorial#readme",
  "devDependencies": {
    "html-webpack-plugin": "^5.5.0",
    "webpack": "^5.72.1",
    "webpack-cli": "^4.9.2",
    "webpack-dev-server": "^4.9.3"
  },
}
Now run npm start and go to localhost:3000.
Adding Loaders
Let's see loaders in action by adding some styling to the application.
Create a file name styles.css and paste the following contents.
body {
    font-family: Arial, Helvetica, sans-serif;
    font-size: 16px;
    background: linear-gradient(to right bottom, #285de5 50%, #4a546f 50%);    min-height: 500px;
    min-height: 100vh;
    color: white;
}


input {
    border-radius: 8px;
    padding: 4px 8px;
}

button {
    background: #00d2ff;
    padding: 8px 16px;
    border-radius: 8px;
    border: none;
    cursor: pointer;
}
Now to import the CSS file into our application, we can use style-loader and css-loader
Installing them by running
npm install --save-dev style-loader css-loader
Add them to the webpack.config.js
const path = require('path');
const HtmlWebpackPlugin = require('html-webpack-plugin');

module.exports = {
  entry: path.resolve(__dirname, 'src/app.js'),
  output: {
    filename: 'main.js',
    path: path.resolve(__dirname, 'build'),
  },
  plugins: [
    new HtmlWebpackPlugin({
      title: 'My App',
      template: path.resolve(__dirname, 'src', 'index.html'),
    }),
  ],
  module: {
    rules: [
      {
        test: /\.css$/i,
        use: ["style-loader", "css-loader"],
      },
    ],
  },
  devServer: {
    static: path.join(__dirname, 'build'),
    port: 9000,
  },
  mode: "development"
};
As discussed earlier,
-
css-loader- Adds support to import CSS files directly into a javascript file. -
style-loader- Used to inject the styles generated fromcss-loaderinto the DOM.
Now import the CSS file in src/app.js
import './styles.css'

console.log('Hello from webpack')
If you reload the application, it should look something like this with styles applied.

Final app
Add the age calculation logic to the app.
In src/app.js
import './styles.css'

const dateInputEl = document.getElementById('dob');
const formEl = document.getElementById('form');
const resultEl = document.getElementById('result');

formEl.addEventListener('submit', (event) => {
    event.preventDefault();
    const dob = dateInputEl.value;
    const calculatedAge = calcAge(dob);
    resultEl.innerText = `Your age is ${calculatedAge}`;

})


function calcAge(dob) {
    const todayDate = new Date();
    const userDob = new Date(dob);
    const diffTime = Math.abs(todayDate - userDob);
    const diffDays = Math.ceil(diffTime / (1000 * 60 * 60 * 24));
    const result = `${diffDays} Days`
    return result;
}
We will not go over each function in detail to keep things simple.
We have a form with an event listener of the type submit. Whenever the user submits the form with his date of birth, we will calculate the age using calcAge the function. And render the result inside a div with id. result.
It looks something like this.

Using third-party libraries and modules
Now let's move the calcAge function into a new file called src/utils.js So that we can reuse it in other places.
export function calcAge(dob) {
    const todayDate = new Date();
    const userDob = new Date(dob);
    const diffTime = Math.abs(todayDate - userDob);
    const diffDays = Math.ceil(diffTime / (1000 * 60 * 60 * 24));
    return diffDays;
}
Import it inside src/app.js
import { calcAge } from './utils';
import './styles.css'

const dateInputEl = document.getElementById('dob');
const formEl = document.getElementById('form');
const resultEl = document.getElementById('result');

formEl.addEventListener('submit', (event) => {
    event.preventDefault();
    const dob = dateInputEl.value;
    const calculatedAge = calcAge(dob);
    resultEl.innerText = `Your age is ${calculatedAge}`;
})
Currently, we are showing age in the only number of days. For better readability, let's use a function from the date-fns library. To install it, run.
npm run install date-fns --save
Now in src/utils.js, replace the logic with functions imported from the date-fns library.
import { formatDuration, intervalToDuration } from 'date-fns';


export function calcAge(dob) {
    const duration = intervalToDuration({
        start: new Date(dob),
        end: new Date()
    })
    return formatDuration(duration)
}
The result will look something like this now.

Conclusion
So far, we have seen how to configure a basic webpack application with plugins, loaders, and third-party libraries. In upcoming articles, we will try to cover some advanced concepts and set up a react application using webpack.
GitHub Repo - https://github.com/bgopikrishna/webpack-tutorial/tree/v5/part-1

Top comments (1)
In 2023 better to use the new html-bundler-webpack-plugin instead of the
html-webpack-plugin.Import a style in JavaScript is not good idea.
Using the html-bundler-webpack-plugin, you can specify source styles and scripts directly in HTML.
For example:
The configuration of Webpack is very easy:
To inject the generated CSS or JS into the DOM you can use the
?inlinequery (w/o additional loaders):New plugin is very powerful and replaces functionality many plugins and loaders such as: